.png?height=120&name=flydocs@2x%20(2).png)
- Help Center
- Fleet Management
- Components Centre / Goods in
-
Home
-
Login
-
Fleet Management
- Search
- Engine Centre / Engine Module Fleet
- Aircraft Centre / Aircraft Utilisation
- Maintenance Control Centre / Manage By Date
- Repair Centre
- Reports
- Current Status
- APU Centre / APU Utilisation
- Repairs
- Link to Inventory
- Engine Centre / Engine Move Management
- Asset History
- Aircraft Centre(Sublinks)
- Maintenance Control Centre / Manage By Asset
- Document Management Centre / Manage Internal Documentation(Listing View)
- APU Centre / APU Fleet Status / APU History
- Maintenance Control Centre(Audit View)
- Components Centre / Goods in
- Document Management Centre / Manage Internal Documentation(Audit View)
- Controls
- Engine Centre(Sublinks)
- Delivery Bible/Delivery Binder/Records Library/Tech Link
- Document Management Centre / Manage Master Documentation
- Engine Centre / Engine Module Fleet / Engine Module History
- Engine Centre / Engine Fleet Status / Engine History
- Maintenance Control Centre(Listing View)
- Compile Files
- Return Project Management
- Aircraft Centre / Aircraft Fleet Status
- Structures
- Engine Centre / Engine Utilisation
- Aircraft Centre / Aircraft Fleet Status / Maintenance History
- APU Centre(Sublinks)
- APU Centre / APU Fleet Status
- Engine Centre / Engine Fleet Status
- Maintenance Control Centre / Manage By Document Type
-
Lifecycle Asset Management
- Portfolio
- Lease Terms
- Maintenance Intervals
- Maintenance Events
- LLP Management
- Redelivery Details
- Company Masters
- AM Inbox
- Exceptions To Acceptance
- Archived Users
- Type Master
- Sub Lease
- Events of Default
- Live Users
- Lease Options
- Delivery Details
- Roles Management
- Lease Management
- Users
- Organisation Masters
- Lease Rates History
- Operational Data Masters
- Thrust Reverser
- General
- Thurst Reverser
- Transaction History
- Master Approval
- Redelivery Conditions
- Control
- Utilisation
- Manage
-
Latest enhancements and updates
-
Search
-
FSCC
-
Reports
-
FAQs
-
Commercial Management
-
Masters
- Aircraft Diagram
- Return Conditions
- Transaction Documents Templates
- Delivery Bible Template
- Watermark Templates
- API Centre
- Repair Diagram Management
- Landing Gear
- Project Templates
- Authorisations and Training Records
- Technical Specification Templates
- flysearch Settings
- Contract Management
- Repair Configuration
- Master Submenu
- Category Master
- Master Types
- flysearch Types
- Export Management
- Master Internal Files
- ATA Codes
- Reason for Archive
- flydoc Templates
- Milestones
- Companies
- Manage Status List
- Document Groups
- Airworthiness Review Templates
- APU
- Mid Term Inspection Templates
- Base Location
-
Clients
-
Project Management
-
Tools
-
Users
-
Technical Management
-
Support
How do I attach documents to Status Entry?
Table of Contents :
How do I attach documents to Status Entry in the component centre?
1.
Login to your account using the username and password provided.
2.
Hover over the Fleet Management tab.

3.
Hover over the Component Centre tab and Click on the Goods in tab.

4.
Select Client from the list.

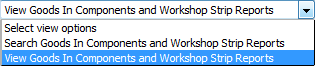
5.
Select View Goods In Components and Workshop Strip Reports options from the list.
6.
Select the Year and Month from the List. It will load data into the grid.

7.
Click on the Open Folder Icon. It will open a new Window.

8.
In the new window, Select the document you want to attach.
9.
Select the required Attach Type from the list and other required fields.

10.
Click on Attach to Status Entry.

11.
In the new window, you have a list of rows available in the grid. Select one or multiple rows where you want to attach the document.

12.
Click on the ATTACH button.

13.
After clicking on the Attach button, If the same filename document is already present then it will show a pop-up message. If you still want to continue the Attachment process then click on the OK button, then the attach process will be done.

14.
It will show a popup message. Click on the OK button.

Note:- If you do not see this option appear it is due to access restrictions for your user account. please contact an administrator.