Table of Contents
- How do I view Thrust Reverser in Claim Management?
- How do I add Thrust Reverser in Claim Management?
- How do I edit Thrust Reverser in Claim Management?
- How do I delete Thrust Reverser in Claim Management?
- How do I filter the audit trail of Claim Management?
- How do I export the audit trail of Claim Management?
How do I view Thrust Reverser in Claim Management?
1.
Login to your account using your current username and password.
2.
Click on the Asset / Lease Management Tab.

3.
Hover on MRClaim Management.

4.
Select the Thrust Reverser tab.

5.
Select Client.

6.
Go to the end of that row and click on the view icon. It will open a new window.

How do I add Thrust Reverser in Claim Management?
1.
Login to your account using the username and password provided.
2.
Hover on Asset / LeaseManagement tab.

3.
Hover on MRClaim Management.

4.
Select the Thrust Reverser tab.

5.
Select the client in the dropdown

6.
Select the data in the grid which you want to claim

7.
Click on View icon at the end of the grid table. It will open in a new window.

8.
Click on the Add button to add the claim. It will open in a new window.
Notes: Once you click on the Add button the row is added.
Notes: Once you click on the Add button the row is added.

9.
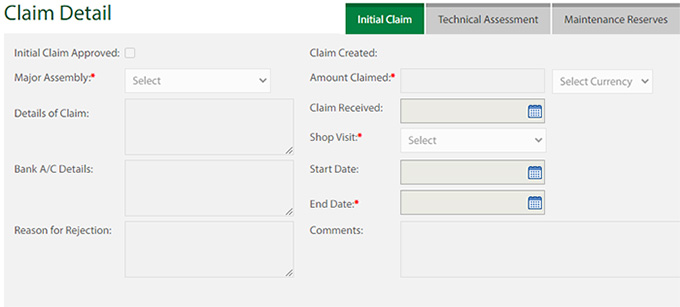
Click on the Edit button to fill the details.

10.
Fill the details for the Initial Claim / Technical Assessment / Maintenance Reserves tab with Approved step by step.

11.
Click on the Save button once you fill the required data.

12.
After the Save, button click the popup will come with a successful message.

How do I edit Thrust Reverser in Claim Management?
1.
Login to your account using the username and password provided.
2.
Hover on Asset / LeaseManagement tab.

3.
Hover on MRClaim Management.

4.
Select the Thrust Reverser tab.

5.
Select the client in the dropdown

6.
Select the data in the grid which you want to claim

7.
Click on View icon at the end of the grid table. It will open in a new window.

8.
Select the row in which you want to edit the claim.

9.
Click on the Edit button to edit the details. It will open in a new window.

10.
Edit the details for the Initial Claim / Technical Assessment / Maintenance Reserves tab with Approved step by step.

11.
Click on the Save button once you fill the required data.

12.
After the Save, button clicks the popup will come with a successful message.

How do I delete Thrust Reverser in Claim Management?
1.
Login to your account using the username and password provided.
2.
Hover on Asset / LeaseManagement tab.

3.
Hover on MRClaim Management.

4.
Select the Thrust Reverser tab.

5.
Select the client in the dropdown

6.
Select the data in the grid which you want to claim

7.
Click on View icon at the end of the grid table. It will open in a new window.

8.
Click on the Delete button to delete the row.

9.
It will open a Popup message. Click on OK.

10.
Another Popup message will be open. Click on OK.

How do I filter the audit trail of Claim Management?
1.
Login to your account using your current username and password.
2.
Click on the Asset / Lease Management Tab.

3.
Hover on MRClaim Management.

4.
Select the Thrust Reverser tab.

5.
Select Client.

6.
Go to the end of that row and click on the view icon. It will open a new window.

7.
Click on the Audit Trail button. It will open the Audit Trail page in a new window.

8.
Select filter types to filter the Audit Trail Report. Like filter by keyword, filter by operations, filter by date, filter by client, etc.

9.
Click on the Filter button to filter the Audit Trail report. It will show filtered data into the grid.

How do I export the audit trail of Claim Management?
1.
Login to your account using your current username and password.
2.
Click on the Asset / Lease Management Tab.

3.
Hover on MRClaim Management.

4.
Select the Thrust Reverser tab.

5.
Select Client.

6.
Go to the end of that row and click on the view icon. It will open a new window.

7.
Click on the Audit Trail button. It will open the Audit Trail page in a new window.

8.
Select filter types to filter the Audit Trail Report. Like filter by keyword, filter by operations, filter by date, filter by the client, etc.

9.
Click on the Export button.

10.
It will show you Popup asking whether you want to open or save the file.

Note:- If you do not see this option appear it is due to access restrictions for your user account. please contact an administrator.
.png?height=120&name=flydocs@2x%20(2).png)