.png?height=120&name=flydocs@2x%20(2).png)
- Help Center
- FSCC
- Historic/ BAU Scanning
-
Home
-
Login
-
Fleet Management
- Search
- Engine Centre / Engine Module Fleet
- Aircraft Centre / Aircraft Utilisation
- Maintenance Control Centre / Manage By Date
- Repair Centre
- Reports
- Current Status
- APU Centre / APU Utilisation
- Repairs
- Link to Inventory
- Engine Centre / Engine Move Management
- Asset History
- Aircraft Centre(Sublinks)
- Maintenance Control Centre / Manage By Asset
- Document Management Centre / Manage Internal Documentation(Listing View)
- APU Centre / APU Fleet Status / APU History
- Maintenance Control Centre(Audit View)
- Components Centre / Goods in
- Document Management Centre / Manage Internal Documentation(Audit View)
- Controls
- Engine Centre(Sublinks)
- Delivery Bible/Delivery Binder/Records Library/Tech Link
- Document Management Centre / Manage Master Documentation
- Engine Centre / Engine Module Fleet / Engine Module History
- Engine Centre / Engine Fleet Status / Engine History
- Maintenance Control Centre(Listing View)
- Compile Files
- Return Project Management
- Aircraft Centre / Aircraft Fleet Status
- Structures
- Engine Centre / Engine Utilisation
- Aircraft Centre / Aircraft Fleet Status / Maintenance History
- APU Centre(Sublinks)
- APU Centre / APU Fleet Status
- Engine Centre / Engine Fleet Status
- Maintenance Control Centre / Manage By Document Type
-
Lifecycle Asset Management
- Portfolio
- Lease Terms
- Maintenance Intervals
- Maintenance Events
- LLP Management
- Redelivery Details
- Company Masters
- AM Inbox
- Exceptions To Acceptance
- Archived Users
- Type Master
- Sub Lease
- Events of Default
- Live Users
- Lease Options
- Delivery Details
- Roles Management
- Lease Management
- Users
- Organisation Masters
- Lease Rates History
- Operational Data Masters
- Thrust Reverser
- General
- Thurst Reverser
- Transaction History
- Master Approval
- Redelivery Conditions
- Control
- Utilisation
- Manage
-
Latest enhancements and updates
-
Search
-
FSCC
-
Reports
-
FAQs
-
Commercial Management
-
Masters
- Aircraft Diagram
- Return Conditions
- Manage Contract Types
- Transaction Documents Templates
- Delivery Bible Template
- Watermark Templates
- API Centre
- Repair Diagram Management
- Landing Gear
- Project Templates
- Authorisations and Training Records
- Technical Specification Templates
- flysearch Settings
- Contract Management
- flydoc Templates Dropdown Master
- Repair Configuration
- Master Submenu
- Category Master
- Master Types
- flysearch Types
- Export Management
- Master Internal Files
- ATA Codes
- Reason for Archive
- flydoc Templates
- Milestones
- Companies
- Manage Status List
- Language Matrix
- Document Groups
- Airworthiness Review Templates
- APU
- Mid Term Inspection Templates
- Base Location
-
Clients
-
Project Management
-
Tools
- How do I generate FSCC One Time Password?
- How do I download the digital verification tool?
- How do I Generate Aircraft Report?
- How do I download the Mid-term Inspections Application?
- How do I download FSCC?
- How do I download the Physical Inspection Application?
- How do I download flydocs Change Request Form?
-
Users
-
Technical Management
-
Support
How do I manage Check Groups?
Table of Contents :
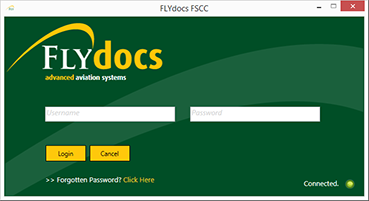
1.
Login to your account using the username and password provided.
Note: These login details will be the same as the FLYdocs web platform.
Note: These login details will be the same as the FLYdocs web platform.
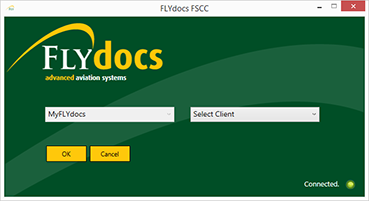
2.
Select a Client from the Client dropdown and then select 'OK'.
3.
Click on Scan at Source tab.

4.
Select Historic/ BAU Scanning

5.
Select a Centre

6.
Select a Component from the grid.

7.
Select the 'View' icon at the right side of the component row to enter the Box/ Folder level window for the selected component.

8.
Double click on the box you want to enter.

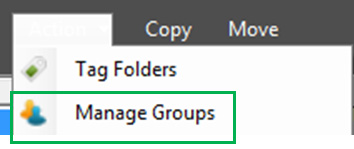
9.
Within the selected box select the 'Manage Groups' option from the 'Actions' dropdown menu at the top of the window.
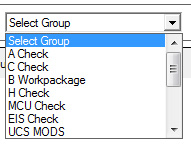
10.
Selecting this option will bring up a window containing a list of Check Types within a combo box. Select the Check Type you want to edit the groups within.
11.
After selecting the Check Type, select the Check Group you wish to manage.

12.
If you wish to delete the selected check group, select the red 'X' besides the check group name.

13.
After selecting this button a prompt will appear to confirm your decision. Select 'Yes' to delete the selected check group or select 'No' to cancel this action.

14.
If you want to edit the name of the check group, select the crayon icon besides the check group name.

15.
After selecting the crayon icon you will be able to edit the text for the check group.

16.
Once you have finished making the text changes, select enter on your keyboard to save your changes.
